


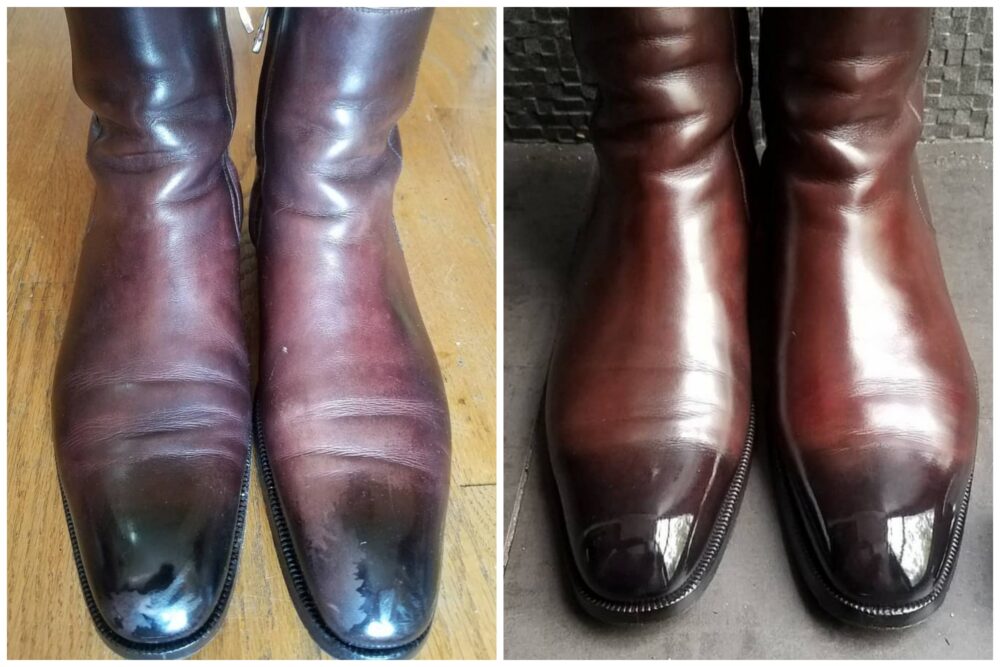
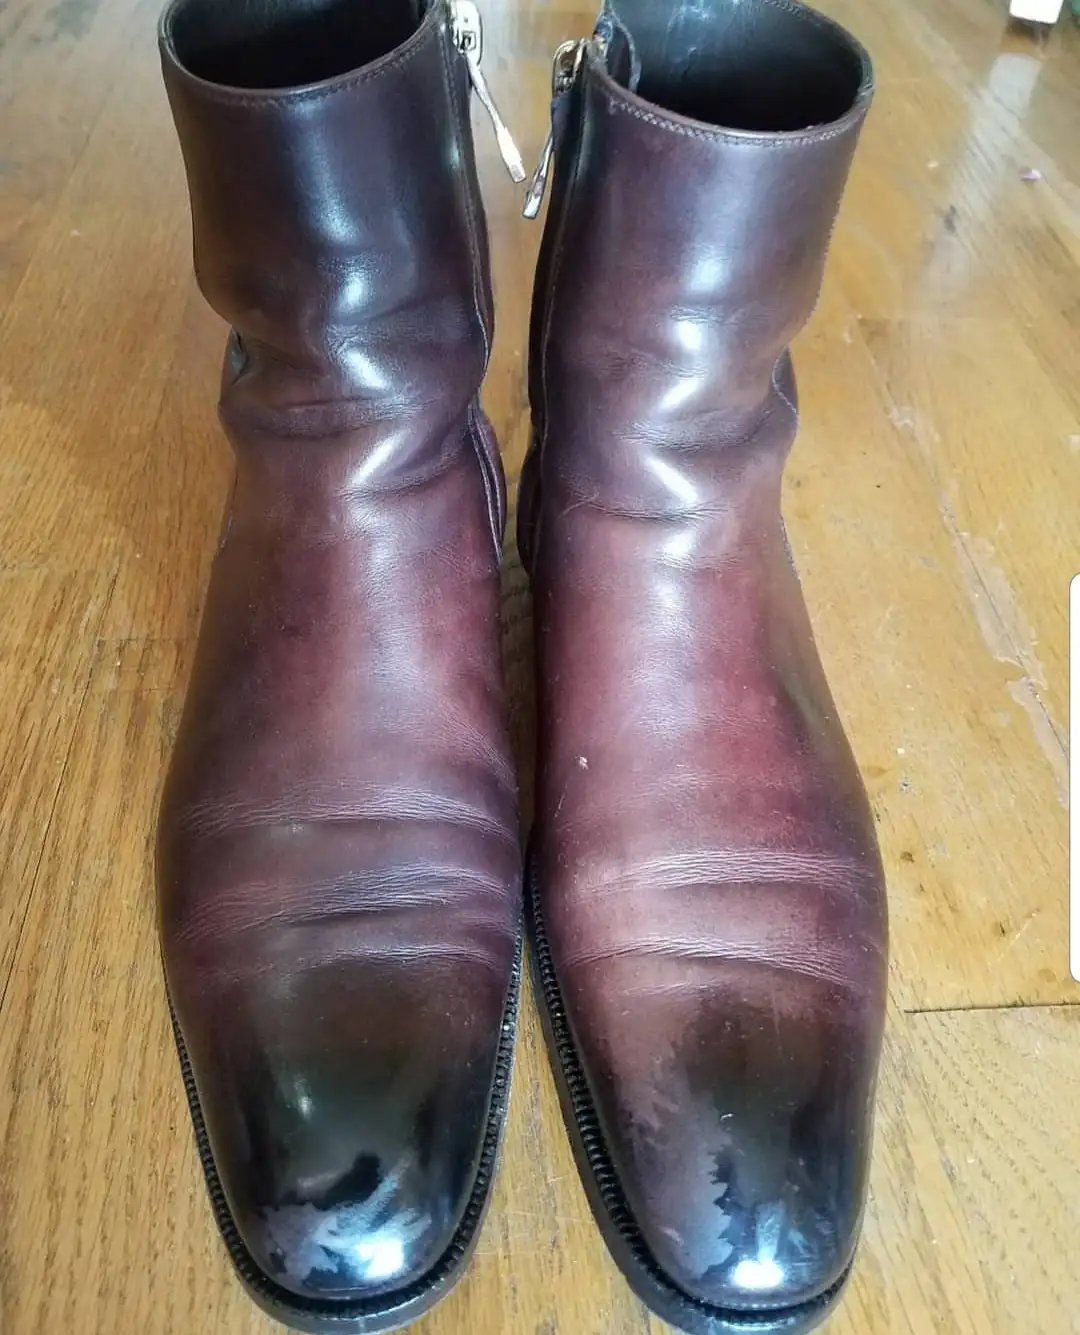
One of the most common misconceptions about a cracked mirror shine is that the leather itself has been damaged. In most cases, that is not true. What you are seeing is usually the wax layer cracking, not the leather beneath it. And it is actually quite common with mirror shines as they are not a malleable surface that bends with the leather. Lastly, more often than not, most people overzealously apply too much mirror shine over the flex points, and that is where the cracking starts.
A proper mirror shine is essentially a hardened layer of wax polish sitting on top of the leather. The shine is created by filling the pores of the leather and slowly building a smooth wax surface until it reflects light like glass. That is why, when the polish starts to crack or break down, it can look far worse than it actually is.
The good news is that this is almost always fixable. The bad news is that once a mirror’s shine has cracked badly, trying to patch only the damaged section rarely gives you a clean result. You can sometimes blend it back in, but more often than not, you will still see the difference between the old shine and the newly built-up section.
In those cases, the best approach is simple: remove the old shine and start again.
Can You Use Heat to Repair a Cracked Mirror Shine?
Another option, before fully removing the mirror shine, is to use gentle heat to soften and even out the wax layer. A heat gun can help here, but the keyword is gentle.
The idea is not to blast the shoe with heat or melt the polish into oblivion. These can both have their own adverse reactions. You are simply warming the wax enough to make it slightly more pliable, allowing the cracks to soften and blend back into the surrounding polish. Once the wax begins to relax, you can lightly buff the area with a soft cloth or polishing glove to help smooth it out.
That said, this is one of those techniques where restraint is crucial. Keep the heat gun moving, keep it at a safe distance, and never hold it in one spot for too long. Too much heat can dry the leather, disturb the finish, or make the wax look cloudy rather than clean.
You also need to be extra careful with lighter-colored shoes. Heat will often darken the wax, reveal uneven polish buildup, or create a patchy look if the wax melts unevenly. On black or dark brown shoes, this is usually more forgiving. On tan, cognac, light brown, or museum calf, mistakes tend to show much more easily.
So, if you are going to try this method, start cautiously. Use low heat, work slowly, and test it on a small area first. If the cracking is only superficial, it may be enough to revive the shine without stripping everything back. If the cracks are deep or the shine has fully broken apart, then it is better to remove the old wax and start fresh.
Assuming you have to start over and remove the old mirror shine in order to get a new one, here is my recommendation for the process:
Step 1: Remove the Old Mirror Shine
The first instinct many people have is to reach straight for something aggressive, such as Saphir Renomat or another stripping agent, such as Saphir’s Decapant. I would strongly advise against starting there, unless you are an expert, of course, or have done this before. These products are fantastic and work well, but require knowledge about which leathers you can use them on, and how they will react.
A mirror shine was built with wax, cloth, and pressure, and in many cases, it can be removed the same way. Start with a clean rag or polishing cloth and use some proper elbow grease to work away the old wax layer. A sitffer horsehair brush can also help loosen and remove a good amount of the surface polish. I often use the horsehair brush as one of the safer ways.
The goal is to remove as much of the old mirror shine as possible by mechanical action first, not by immediately attacking the leather with a strong product.
Once you have removed most of the old wax, you can use a small amount of Saphir Renomat or a similar product for the stubborn areas that remain. But be careful. Products like this are concentrated and can affect the finish of the leather if overused.
Use as little as possible, work slowly, and do not soak the leather.
After using any stripping product, allow the shoes to dry fully. Overnight is best.
Step 2: Condition the Leather
Once the old polish has been removed, the leather needs to be replenished. You have just taken away layers of wax, polish, and potentially some of the oils sitting near the surface of the leather. This is where Saphir Renovateur comes in.
Apply a small amount of Renovateur to the leather and massage it in evenly. You do not need much. One of the biggest mistakes people make with high-quality shoe-care products is using too much. Start small and only add more if necessary.
Allow the shoes to rest for at least 20 minutes after conditioning. Then brush them well with a horsehair brush.
This step matters because leather needs nourishment, especially after being stripped or cleaned aggressively. Think of it like skin. If you dry it out, it needs something put back into it.

Step 3: Bring Back the Color
After conditioning, the next step is to restore the color and depth of the leather. For this, use a proper cream polish.
Saphir Medaille d’Or Cream Polish is ideal here, as it helps replenish color while adding a soft luster to the leather. Apply it with an applicator brush or welt brush rather than a large cloth. A cloth often absorbs more product than the shoe does, especially when working around the toe and seams.
Apply a thin, even layer and allow it to dry for around 20 minutes. Then brush the shoe thoroughly with a horsehair brush.
(**One thing to note, if you have used the heat method, do not apply this over the existing mirror shine. Only use the welt/horsehair brush if you rebuilt the entire shine.)
This is where the shoe starts to come back to life. You are not trying to create the mirror shine yet. You are restoring the base: color, richness, and depth. That is what the mirror shine is built upon.
If you attempt to skip this step, you will eventually pull color from the surface. Cream polish helps to replenish what is lost from wax shines (which essentially dry out the leather over time).
Step 4: Rebuild the Shine with Wax Polish
Once the leather has been cleaned, conditioned, and recolored, you can begin rebuilding the shine.
For this, use a wax polish such as Saphir Pate de Luxe. Apply small amounts at a time, working in thin layers. The toe and heel counters are the safest areas for building a higher shine because they are stiff and do not flex much. Avoid heavy wax buildup across the vamp, as that is where cracking is most likely to occur, and you will just have to repeat this entire process shortly after. Stick to the toe area.
If you only want a quick shine, a few light layers of wax and a good buffing may be enough. If you want a true mirror shine, you will need to build slowly, adding tiny amounts of wax and water over multiple layers. The key is to allow for drying, which helps you build the layer more easily.
The good thing is that once a shoe has already had polish worked into the pores, it often becomes easier to rebuild a shine the next time around. The more regularly you care for your shoes, the quicker the process becomes.
A Final Word of Caution
Do not panic when you see cracking in a mirror shine. More often than not, it is the wax polish that has failed, not the leather. That said, do not rush the restoration process either.
Avoid starting with harsh stripping products. Remove as much as you can by hand first, use stronger products sparingly, condition the leather afterward, and rebuild the shine in thin layers.
Good shoe care is rarely about force. It is about patience, restraint, and using the right product at the right stage.
And when it comes to this sort of restoration, Saphir remains one of the best product ranges in the world for the job. The key is knowing when to use each product — and, just as importantly, when not to overuse it.
Pictures courtesy of @wrekd_lucy on Instagram, who was the regional manager of The Shoeshine Guild
For a full workover restoration post, you can see the ‘polish your shoes properly‘ post.
Find Saphir products at: The Shoe Snob Shop
—Justin FitzPatrick, The Shoe Snob
Shop · Marketplace · J.FitzPatrick · Patreon