Summary
- Gmail Auto-Advance feature streamlines inbox management, making it easier to go through emails quickly.
- Enabling Auto-Advance in Gmail settings helps prioritize and organize email conversations effectively.
- Auto-Advance is available on Gmail mobile app for Android users, not yet for iOS users, promoting productivity.
Email is the best and the worst thing to happen to the typical 9-5. It makes connecting with others incredibly easy — almost too easy, now that work still has a way of knocking on your window after EOD. It’s tempting to go through your inbox after hours and try to chip away at the mountain of digital mail piling up in your computer.
Yes, the dreaded red notification symbol hovering over your Gmail app. I know it well, unfortunately. Though my work email’s unread count pales in comparison to the personal Gmail that’s been collecting tens of thousands of marketing emails for the last decade, the dozen or so I receive a day still feels daunting. However, I’m in publishing, and I can’t imagine what my comrades in sales must go through every single morning they open up their laptops.
Luckily, there’s a setting buried in the menus of your Gmail account that can streamline the process of getting through the mountains in the morning. Enabling it is easy, and you’re going to wonder how you made it to Friday every other work week of your life.
What is Auto-Advance?
Your lifesaver
Auto-Advance isn’t new. Google announced it 15 years ago when users requested a feature that automatically moved them to the next conversation after they acted on the current one. It still functions as such today — ‘act’ meaning deleting, archiving, or muting a conversation. Without it enabled, Gmail bounces you back to the main inbox page, which isn’t ideal if you’re trying to cruise through spam or marketing emails in particular.
Auto-Advance does not automatically move you to the next conversation after replying or forwarding.
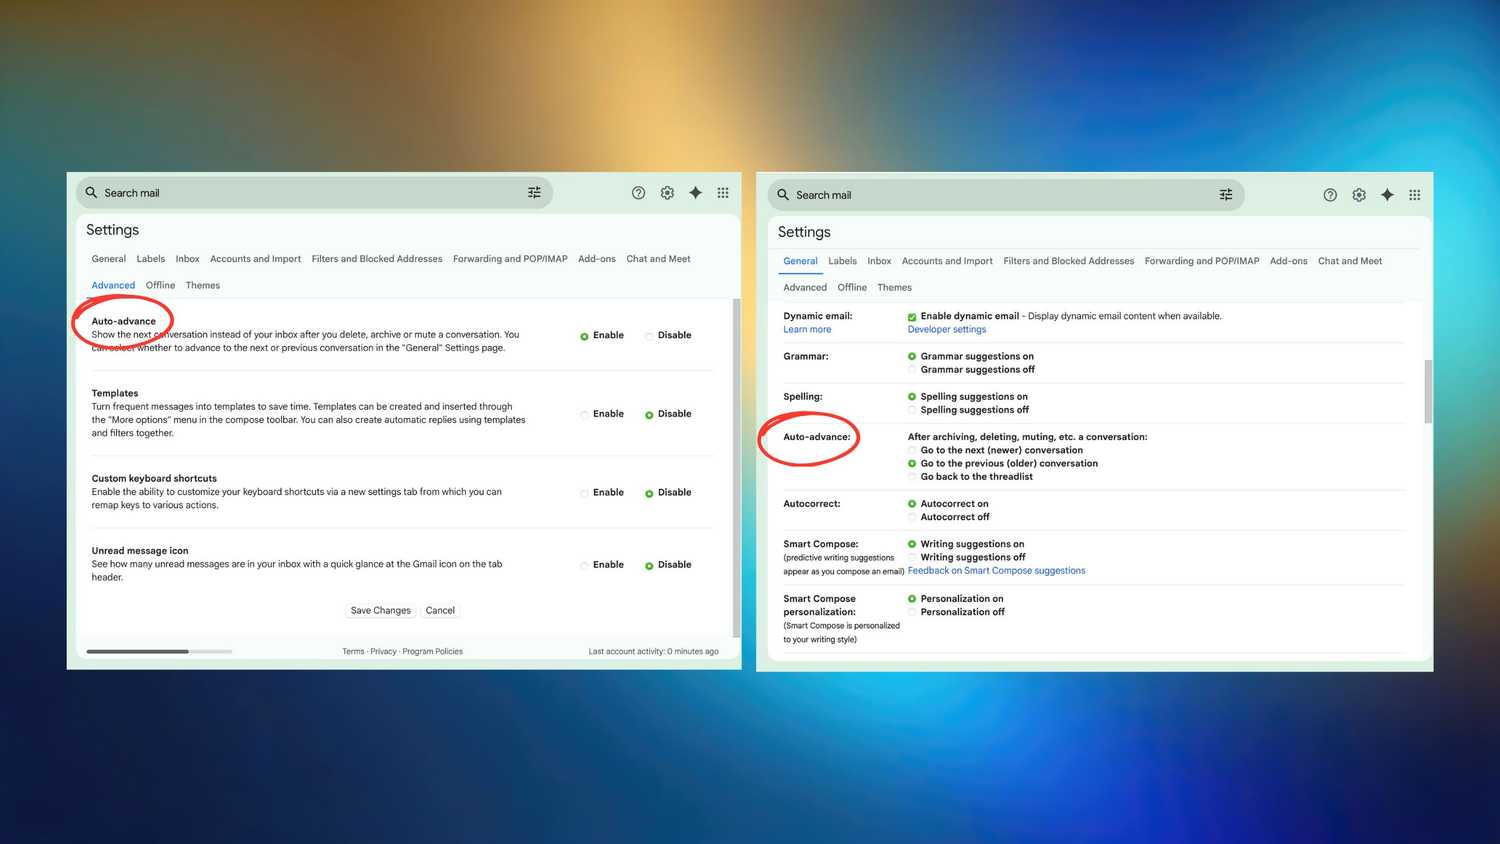
It’s super intuitive, and you’ll wonder why you ever did the mass select-and-delete of old. Here’s how to turn on Auto-Advance:
- Log into your Gmail on a browser.
- Click the gear icon in the upper right corner.
- Select See all settings.
- Click the Advanced tab.
- Under Auto-Advance, toggle Enable.
- Go back to the General tab.
- Scroll down to Auto-Advance, and choose one of the three options.
Out of the newer, older, and threadlist options, I chose to go to the older conversation. It’s a lot less overwhelming for me personally to start at the top and work my way down rather than dig deep into the unread pile and try to work my way up.
Can I use Auto-Advance on mobile?
If you’re part of the lucky group
There’s good and bad news — Auto-Advance does exist on the Gmail mobile app, just not on iOS. It’s a great day to be an Android user, while folks locked inside the Apple walled garden (like me) have to enjoy it only on a browser for now. I’ll take that as an extra measure to keep work on my laptop, and off my iPhone, though.
To do this on your Android phone:
- Open your Gmail app.
- In the top left corner, tap the three stacked lines to open the menu.
- Scroll down until you find Settings.
- If you have multiple accounts, select the one you want to enable Auto-Advance on.
- Tap on General settings.
- Scroll down until you find Auto-Advance. Tap on it, and select your desired option.
Until this is available on iOS, I’ll let the Android users rejoice. However, a big shoutout to Google for throwing Apple users a bone and letting us enjoy Auto-Advance on browser. Here’s to less cluttered inboxes all around.


