


When Microsoft debuted the Start Menu back in 1995, it was a genuine graphical user interface (GUI) revelation. The company successfully crafted a software setup that was both performant and highly accessible to the public, which is no small feat.
Since the release of Windows 95, the Start Menu has evolved in a number of ways, and yet, to this very day, its fundamentals remain unchanged: you have access to all your installed programs, a search function, a power button, a user account shortcut, and some space to pin frequently accessed apps.
However, operating systems have evolved considerably since the days of Windows 95, and the Start Menu, for all its glory, has become something of a GUI vestige. Most of us now pin apps directly to our PC taskbars, and searching for apps is simpler and more efficient than ever before.
As such, the modern-day Start Menu on Windows 11 is best understood as a sort of app shelf, analogous to the app drawer on Android and the App Library on iPadOS. When properly configured, the Start Menu can serve as an excellent one-stop-shop for viewing all your installed apps from a bird’s eye point of view.

Microsoft recently pushed out a Start Menu redesign for Windows 11, and it’s a solid upgrade: this new menu is far less rigid than its immediate predecessor, allowing you to remove superfluous UI elements and to streamline its design. Some users have complained that the new menu is too cluttered by default, and there’s certainly some validity to that argument.
With this all-new Start Menu, Microsoft is finally allowing us to bend the interface to suit our individual needs. In my case, I’ve gone ahead and transformed the menu into something that looks and feels just like the app drawer found on my Pixel 10, and I couldn’t be happier with the end result.
Even though Microsoft released this new-and-improved Start Menu to the public back in October of last year, the company’s Controlled Feature Rollout system means that it might not be active on your PC quite yet. If you’re still seeing the old Windows 11 Start Menu, you can expect the upgraded version to arrive on your PC sometime in the coming weeks.
Step 1
Turn off your mobile device in Start

To start with, you can remove the secondary mobile device pane from appearing in your Windows 11 Start Menu. This panel provides quick access to your phone’s status, recent photo, call, and message history, and other perks. For as useful as it can be, it does admittedly clutter up the Start Menu experience a bit when activated.
To remove your mobile device from the Start Menu, navigate to Settings > Personalization > Start > Show mobile device in Start and set the toggle to its off position. Alternatively, if you’d like to maintain quick access to the mobile device panel without it taking up space when you don’t need it to, leave the toggle on and then tap on the small phone icon located at the top right-hand side of the Start Menu (to the right of the search bar) to collapse and expand the interface as needed.
Step 2
Disable the Recommended and most used sections

Next, you can remove the Recommended section from your Start Menu, which will save you space, reduce clutter, and potentially speed up performance. By default, the Recommended section surfaces recently installed apps, recently updated files, commonly visited websites, tips, tricks, and more. Recommendations can be disabled wholesale, as can the list of most used apps within the All section of the menu.
To disable both the Recommended and the most used apps sections from appearing in your Start Menu, navigate to Settings > Personalization > Start > and toggle off the following:
- Show recently added apps
- Show recommended files in Start, recent files in File Explorer, and items in Jump Lists
- Show recommendations for tips, shortcuts, new apps, and more
- Show websites from your browsing history
- Show most used apps
Note that by toggling off the Show recommended files in Start, recent files in File Explorer, and items in Jump Lists entry, you’ll be losing access to the aforementioned File Explorer and Jump List perks — for better or worse, Microsoft couples all these settings together alongside Start Menu file recommendations.
Step 3
Switch to Grid View

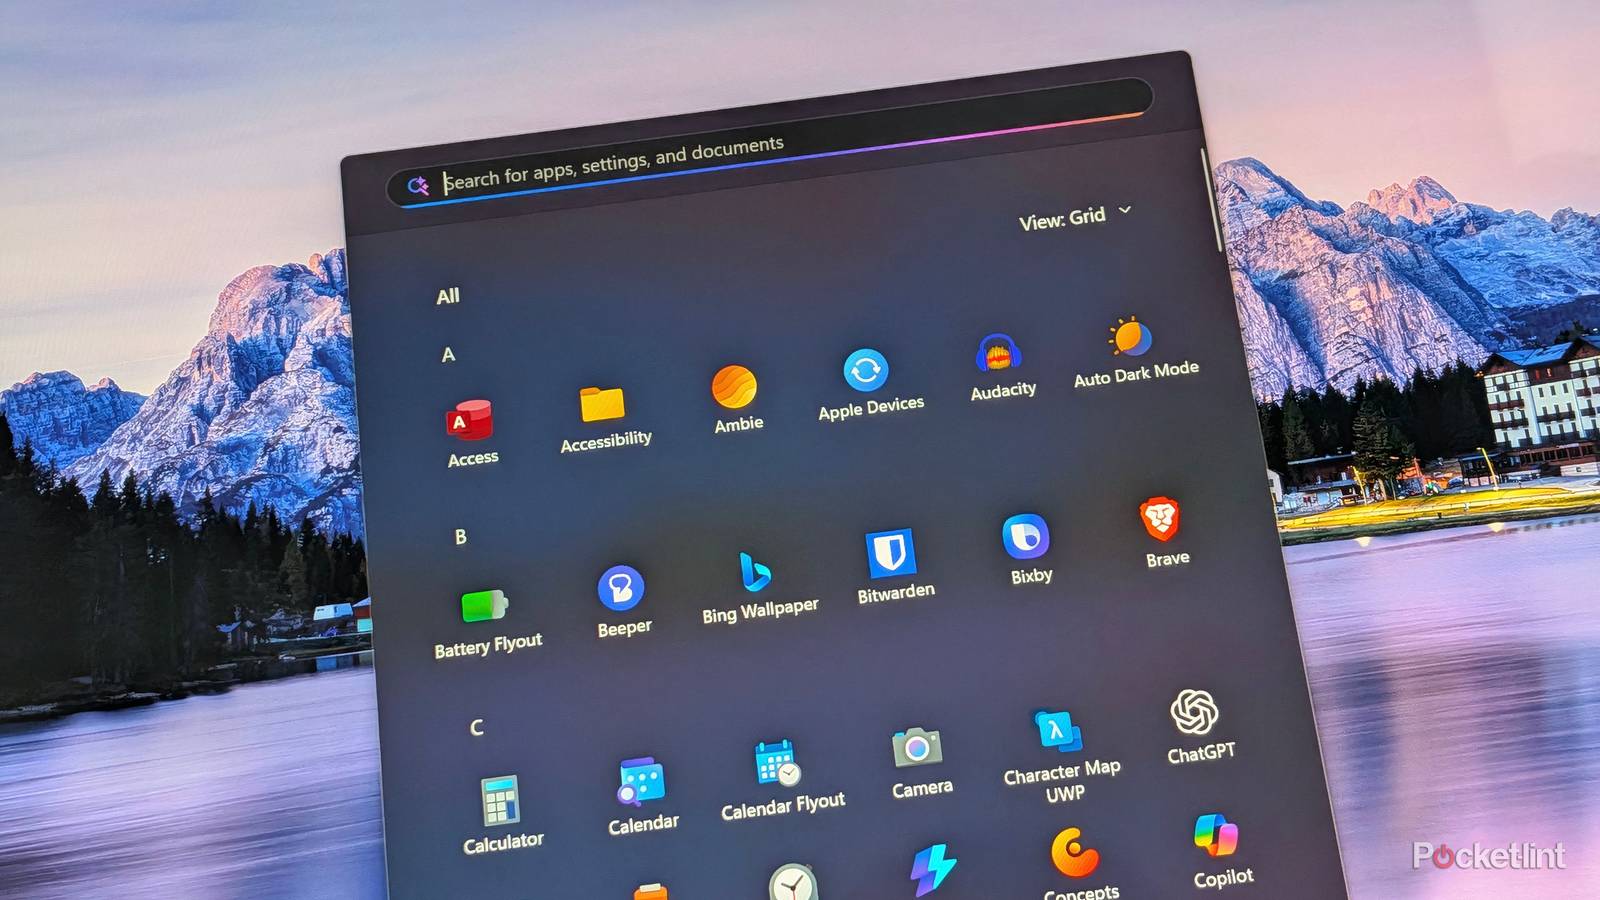
If we’re truly going for the Android app drawer look and feel, you’ll want to switch over from the Category View to the Grid View within your Windows 11 Start Menu. This will sort all apps in alphabetical order, laid out in a grid format that resembles what you’d find on your typical Android smartphone or tablet setup.
To switch to the Grid View layout within your Start Menu, launch the Start Menu, tap or click on View, and then select Grid from the drop-down menu that appears on-screen. Windows will remember your preferred app sorting layout across reboots, and you can always switch to the List or Category View options at any point in time.
Step 4
Remove all app pins

You probably already have your go-to apps pinned to your taskbar, and so there’s little point in cluttering up your Start Menu with yet more pins. Thankfully, if you remove all pins from the top of your menu, the entire section will disappear. This maximizes the available real estate for displaying all your currently installed applications instead.
The entire pinned apps section within the Start Menu can be removed by unpinning all applications and folders one by one. Depending on how many pins you have, this process may take a few minutes. To unpin an app within the Start Menu, simply right click or long press on the app, and then tap or click on Unpin from Start.