


As a pen and paper loyalist for so many years, I will admit I was reluctant to dip my toes into the world of digital notebooks — especially iPads. I’d scoff at the notion of studying from anything but the pages of a spiral notebook back in my academic days. But now that I’m not studying for exams every other week, I must confess that I’ve caved: my two daily drivers are a Kindle Scribe Colorsoft and a hot pink iPad A16.
While my Kindle Scribe is more aesthetically pleasing on my desk, you can’t argue with the capabilities of an iPad — not to mention the seamless syncing it does across the rest of my Apple devices. But I refuse to pay for some third-party app when Apple Notes exists, so I was determined to find every tip and trick Apple hid in there to make my notes look as stellar as they did in those spiral notebooks back in the day. Here’s a list of the five most important upgrades I made in my iPad’s Notes app.

- Brand
-
Apple
- Storage
-
128 GB
- CPU
-
A16
- Operating System
-
iPadOS
Apple’s most colorful iPad model complete with the A16 chip.
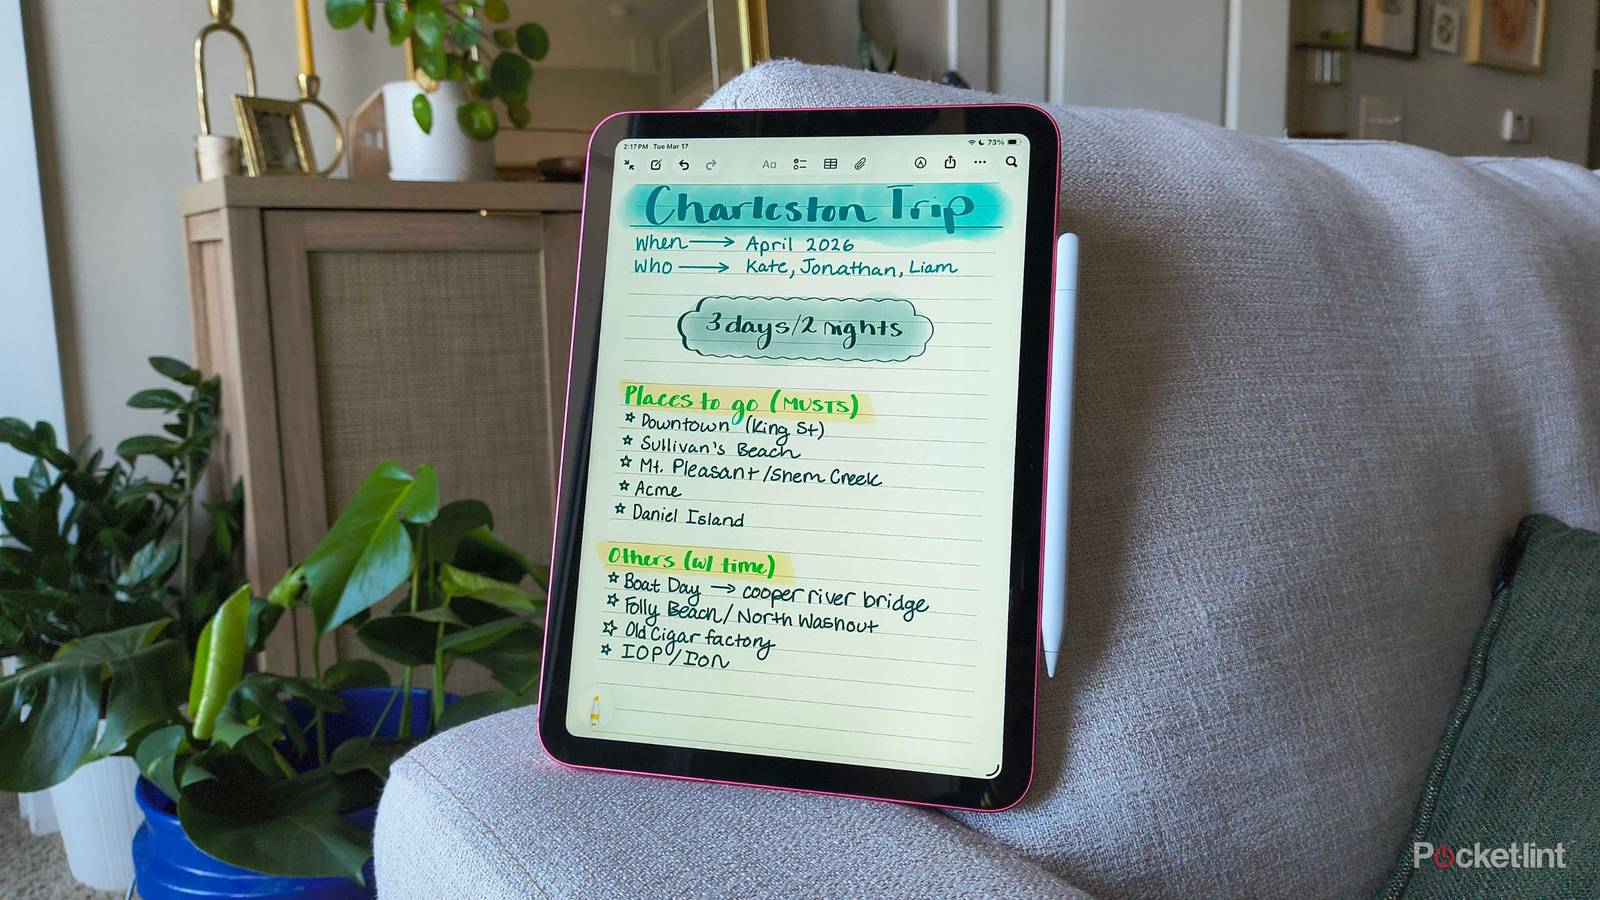
Add grids or lines
Starting from the top

I don’t have much spatial awareness on a flat plane — I was never allowed to write on poster boards during group projects in school. A blank piece of paper is a nightmare for a perfectionist like me, so I desperately need some guidelines to keep my bearings on a page.
Luckily, Apple Notes doesn’t just have to remain in its default blank state. When you create a new note, there will be a three-dot menu in the top right corner beside the magnifying glass. When you tap it, a dropdown menu will appear with plenty of options, but the one you’re looking for is Lines & Grids near the bottom.
Inside Lines & Grids, there will be six additional options for handwriting in that note. I prefer the medium-ruled lines for most of my notes, but I also find the grid helpful for habit tracking. Once you tap the option you want, it will appear on the note.
Auto-Refine Handwriting
Slightly smoother printing

I’m the first to admit that writing on a tablet like an iPad or even a Kindle Scribe just isn’t the same as real paper and pen. Because of this, my handwriting quality goes exponentially down when I’m taking notes on my iPad. However, the convenience of digital note-taking is too hard to pass up, so for a long time, the aesthetics of my notes simply suffered.
But alas, there was an antidote to my ailment — Auto-Refine Handwriting. If you open the toolbar at the bottom of your note and look on the far right side, you’ll see another three-dot menu. Tap it, and toggle on Auto-Refine Handwriting. Now, when you write something within the note that your iPad thinks is a little sloppy, it automatically straightens and smooths out your lettering to make it easier to read.
If you’re attached to your penmanship, don’t worry — Auto-Refine doesn’t completely change the way your letters look. It just subtly smooths them out.
Straighten text
Because we all get a little off-kilter sometimes


You know how I mentioned Lines & Grids earlier? Well, sometimes I feel a bit braver than I should and try to free-write my notes. Usually, it doesn’t end well, with almost all my text ending up in uneven, sloping lines. As you read from left to right, your eyes start to move not just across the page, but down it.
Nobody’s perfect, but Apple Notes can take my mistakes and straighten them out — literally. If a handwritten note feels slanted or curved when it shouldn’t be, you can tap and hold on the text you just wrote, and it will be highlighted in yellow. Then, a pop-up menu will appear with an arrow on the far right — tap the arrow. The last option will say “Straighten,” which is what you can tap to make your iPad straighten out your words and put them on a flat plane.
Automatic writing-to-text
Handwriting vibes, clean text reality

Throughout my entire academic career, I took handwritten notes. Even when lecture halls were filled with brand-new MacBook Airs and iPad Pros, I was sitting in the front row with my trusty spiral notebooks, taking color-coded notes with Paper Mate pens. I always thought writing things down helped my brain process and learn them better, and I was willing to pay for that knowledge with the inconvenience of analog note-taking.
But now that most of my note-taking comprises travel itineraries, shopping lists, and creative planning, I’m not particularly worried about permanently etching the notes I take into my brain. It’s what’s freed me up to become an iPad note-taker, but sometimes I do miss pushing a pencil onto paper — although I don’t miss my messy chicken-scratch. Luckily, your iPad’s built-in Notes app has a ‘pen’ that immediately transcribes your writing into perfect text.
In a note, make sure you’re in drawing mode by tapping the pen inside the circle in the top-right corner of your screen. Then, in the toolbar at the bottom of your screen, find the gray pen on the far left with the letter ‘A‘ on it. Tap it, and then start writing with your Apple Pencil. Immediately, your iPad will begin to translate your handwriting into the Notes app’s default text.
Three-finger swipe to undo
My favorite productivity shortcut

While this might be the smallest upgrade I made to my note-taking, it’s by far the most impactful. If I make a mistake (which happens quite often) I don’t have to lose my flow in the note by jumping down to the eraser, undo action arrow, or even the quick scribble-out-and-hold technique the Apple Pencil offers.
Instead, I can swipe left with three fingers to undo an action without even putting down my Apple Pencil. The inverse works too — if you want to redo an action, a quick swipe right will do the trick.